How to Plan a Basement Renovation That Prevents Moisture Problems
Key Takeaways
- ✓ Plan the moisture strategy first and the finishes second.
- ✓ Solve any water problem before framing, not after.
- ✓ Choose materials that tolerate occasional dampness. Avoid placing organic materials directly against concrete.
- ✓ Plan for a sump pump, a backwater valve with professional plumbing advice, and a dehumidifier from the start.
- ✓ Keep drains, the sump pump and shut-off valves accessible for future maintenance.
- ✓ Budget enough time and money for the hidden work needed to keep a basement dry.
A finished basement can add a family room, guest suite or home office. It can also become an expensive problem if moisture is not part of the plan. In Ontario, freeze-thaw cycles, spring melt and heavy summer storms all test basements. Here is how to plan a basement renovation that stays dry, in the order the decisions should be made.
1. Start with a moisture history
Before you choose flooring or paint, answer these questions:
- Has water ever come in? Where and when?
- Does the basement smell musty?
- Has the sump pump ever failed, or the floor drain backed up?
- Are there signs like white powder on walls, stains, or rust on metal at the floor?
If you bought the house recently, ask the previous owner or check any home report you have. Be honest about what you find. Covering a known problem with drywall does not make it go away.
2. Fix the outside first
The cheapest dry-basement work is often above ground.
| Exterior item | What to aim for |
|---|---|
| Grading | Soil sloping away from the house |
| Downspouts | Discharge well away from the foundation |
| Eavestroughs | Clean, attached, not overflowing |
| Window wells | Clear, drained, ideally covered |
| Hard surfaces | Patios and walks sloping away |
Do this work before the renovation starts, and watch the basement through a rainy period or spring melt afterward if you can.
3. Decide whether you need waterproofing
If water has entered in the past, or the wall shows signs of moisture movement, talk to an experienced contractor about waterproofing before finishing. Options include interior drainage systems with a sump, and exterior excavation and membrane. The right choice depends on your foundation, lot and the cause of the water. Fixing this after the basement is finished means tearing out new work.
4. Plan for sewer backup protection
Basement flooding from heavy storms often comes up through the floor drain rather than through the walls. A backwater valve on the main sanitary line, installed by or with a licensed plumber, is a common way to reduce that risk. Plan it before the floor is finished so the access cover stays reachable.
5. Get the sump right
If your home has a sump pump, the renovation is a good time to:
- Replace an old pump.
- Add a high-water alarm.
- Consider a battery backup.
- Make sure the discharge goes away from the house.
- Plan an accessible, removable cover in the finished floor or a closet.
6. Choose a wall assembly that tolerates dampness
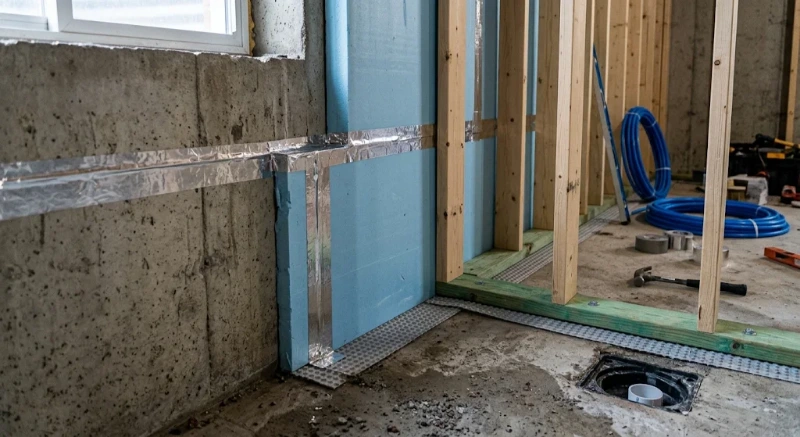
Concrete walls are cool and can carry some moisture even in a dry basement. The safest assemblies avoid putting wood, paper-faced products, or fibrous insulation directly against the concrete.
A common approach:
- Rigid foam insulation directly against the concrete, with joints taped and edges sealed.
- Framing inside the foam, with a pressure-treated or protected bottom plate.
- Moisture-resistant drywall, kept slightly off the floor.
Avoid adding a plastic sheet against the concrete behind fibrous insulation; it can trap moisture. Ask your contractor to explain how their wall dries if it ever gets wet.
7. Pick flooring for a basement
| Flooring | Basement suitability |
|---|---|
| Luxury vinyl plank / tile | Good; tolerates moisture |
| Ceramic or porcelain tile | Excellent on a dry slab |
| Engineered wood | Use with care and an appropriate underlay |
| Solid hardwood | Generally not recommended below grade |
| Wall-to-wall carpet | Risky; holds moisture and odours |
A subfloor or underlayment with a built-in air gap can help separate the finished floor from a cool slab.
8. Control humidity
Even a basement with no leaks can be damp in summer. Plan for:
- A dehumidifier, ideally with a drain to the floor drain or sump so it runs without emptying a bucket.
- Good air circulation with the rest of the house.
- A bathroom exhaust fan that vents outside, if you add a bathroom.
- A simple hygrometer to watch humidity.
9. Leave access
Do not bury shut-off valves, cleanouts, the backwater valve, the sump or the main electrical panel. Plan removable panels or closets. Being able to check these items quickly saves time and damage when something goes wrong.
10. Build the schedule and budget around the dry work
The parts of a dry basement that you cannot see after finishing take real time: exterior fixes, waterproofing, sump work, the backwater valve, and insulation details. Put them at the front of the schedule and protect them in the budget. Cutting corners here to afford a nicer finish is a common and costly mistake.
11. Plan the layout around moisture-prone areas
Where you put each room matters. Some practical layout choices:
- Keep bedrooms and offices away from the wettest wall. If one wall has a history of dampness, put storage, a utility area or a laundry room there.
- Put bathrooms and laundry near the existing drains. Shorter drain runs mean fewer slab cuts and fewer joints that can leak.
- Leave the utility room unfinished or lightly finished. The furnace, water heater, sump and main shut-off are easier to service, and a leak there is easier to spot.
- Raise storage off the floor. Shelving with a bottom shelf a few inches up protects belongings if water does appear.
- Think about egress and windows. Larger basement windows need well-drained window wells with covers, or they become a new water entry point.
12. Agree on what “dry” means with your contractor
Before work starts, ask your contractor to explain in plain terms how the plan handles each type of water: rain and snowmelt, groundwater, sewer backup and humidity. A good answer names a specific step for each. If any of the four is missing from the plan, ask why. Get the scope in writing so everyone is working from the same list.
Planning checklist
- Moisture history gathered
- Exterior grading and drainage fixed
- Waterproofing need assessed
- Backwater valve planned with a plumber
- Sump pump, alarm and backup reviewed
- Wall assembly chosen for dampness tolerance
- Basement-suitable flooring selected
- Dehumidifier and ventilation planned
- Access panels designed in
- Schedule and budget prioritize dry work
Final thoughts
A dry basement is designed, not hoped for. Make moisture the first decision in your plan, choose materials that forgive the occasional damp day, and keep the key systems accessible. Your new space will be more comfortable and will last far longer.
About The Contributor: Yama Nehan is a licensed contractor in the Greater Toronto Area with about 20 years of hands-on construction experience and about 15 years in home inspection, and is among the top inspectors in Ontario. He is an InterNACHI member and studied construction engineering at George Brown (Building Renovations).